Hello Everyone, I hope you are doing well,
I recently got the opportunity to have my garden artwork creation process published by 80.lv and Blender Nation.
Links to the articles are below here:
https://www.blendernation.com/2019/11/25/behind-the-scenes-garden-blender-2-8/
https://80.lv/articles/creating-a-simple-stylized-japanese-garden-in-blender/
I am happy to share the details here as well in case someone is interested to know more. I have used Blender 2.8 for this project.
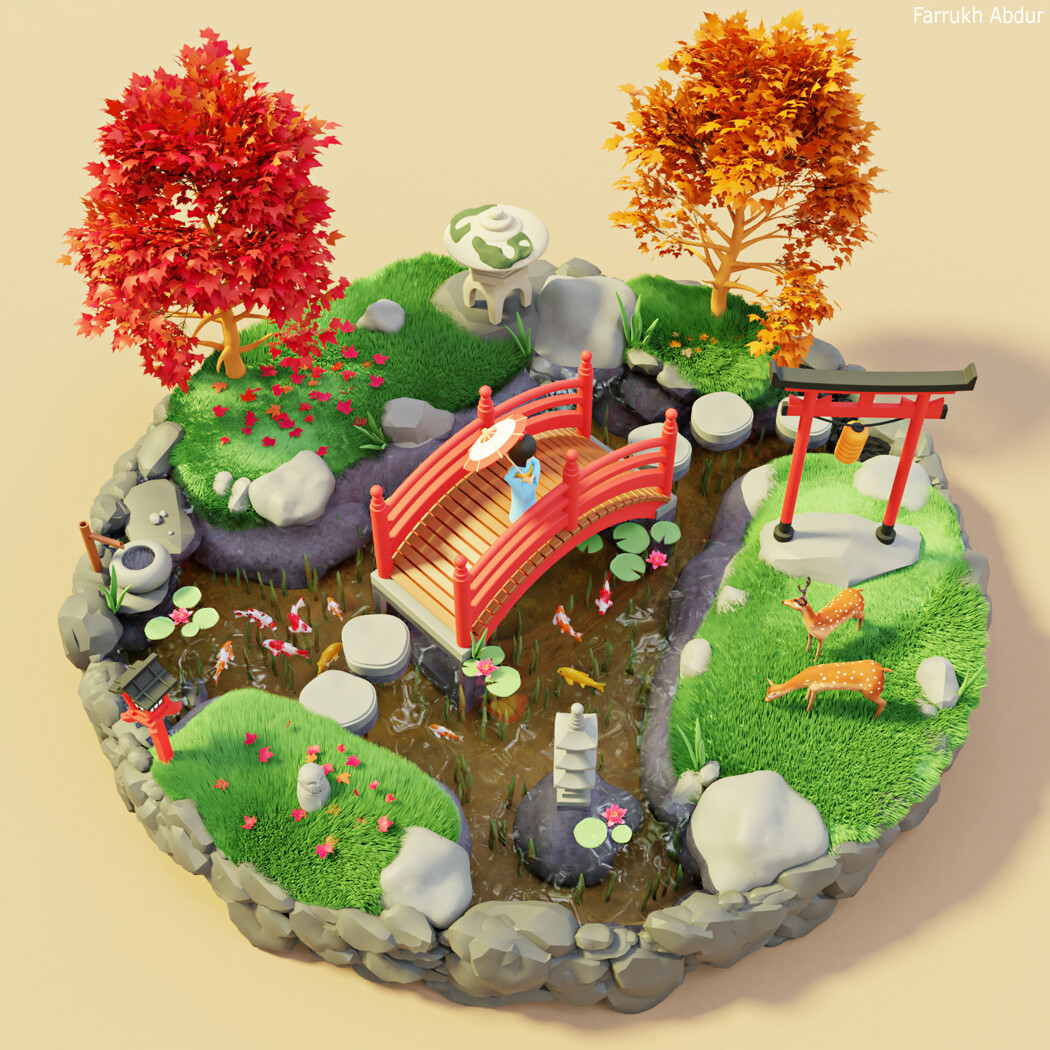
Garden Art - Blender Eevee - 360 Turntable Video Realtime
Concept Idea
As the fall season was coming, I started exploring different colors of fall and wanted to create an artwork based around it. I looked for different reference places and in the end, I selected the Japanese theme gardens as the main source of inspiration for my artwork.
Collecting References
Before starting with anything in Blender, the first step was to gather reference images of Japanese gardens and fall season colors. After collecting the references, I started identifying which objects I would be including in my work. The references were really helpful in making the scene representation more pleasantly similar looking to a garden that I wanted to show.
For this project, I was going for more stylized forms yet maintaining a Japanese theme alongside.
Here are some of the references which I collected from the start to study.

Reference Sheet
Modeling
The modeling process that I use is standard poly modeling techniques. Starting with one object at a time and completing it. Usually, I use simple primitive shapes like cubes, cylinders as the starting point. As the final views were going to be mostly from a distance, I did not need too many details to the models.
In some objects, I added a subdivision modifier to make them smoother. There are about 25 different objects in this scene.
I have added some views of the different 3d models that I created.
In most cases, I make only one half in models if there are symmetrical. Afterward, I add a mirror modifier to generate the other side.

Once one model is complete, I keep each original model in a different collection layer. In case if I need it later. A linked instance can be created so changes made to the master model are reflected across the instances in the scene.


Most models are built following reference images as a guide. Sometimes the model comprises of smaller parts or sections.

I change the proportions also during the creation process as I was not going for a completely realistic look.
Sometimes I add bigger blocking shapes to help define the model with smaller parts.


There are some models that needed to be created with sculpting tools as the poly modeling method would have taken more time. For this purpose Blender’s new sculpting tools are great.
Using the new remesher tools to combine meshes and then later generate clean topology.

For any sculpt, I blockout the basic shape with spheres or cylinders to draft a shape, then remesh them to combine together, smooth the surface joints and start adding adjustments or details. I was mostly working with low mid poly meshes during sculpt mode. Sculpting brushes like the grab brush, smooth brush, and pinch brush are a few ones common to use.

The remesh panel offers two options. Voxel and Quad. First I use Voxel to combine the meshes into one and later if needed Quad can be used to clean the mesh topology more.

Creating Grass
For the grass, I first created a plane and then added hair particle setup. I used 2-3 different patches of grass and placed them in the scene. The material I used is a standard BSDF shader.

For the underwater plants, it is also using a particle setup. I assigned a custom object collection over a flat plane and changed some parameters to spread it across. For this collection, I made few plant shapes and place them in a separate collection.

Koi Fish and Material Creation
For the fishes, I modeled one and then later created different material variations for it. The pattern is a procedural material which allows creating any sort of Koi looking pattern. I have added a tutorial also below.
For variation, I added a bend modifier to slightly make the fish body shapes differently.

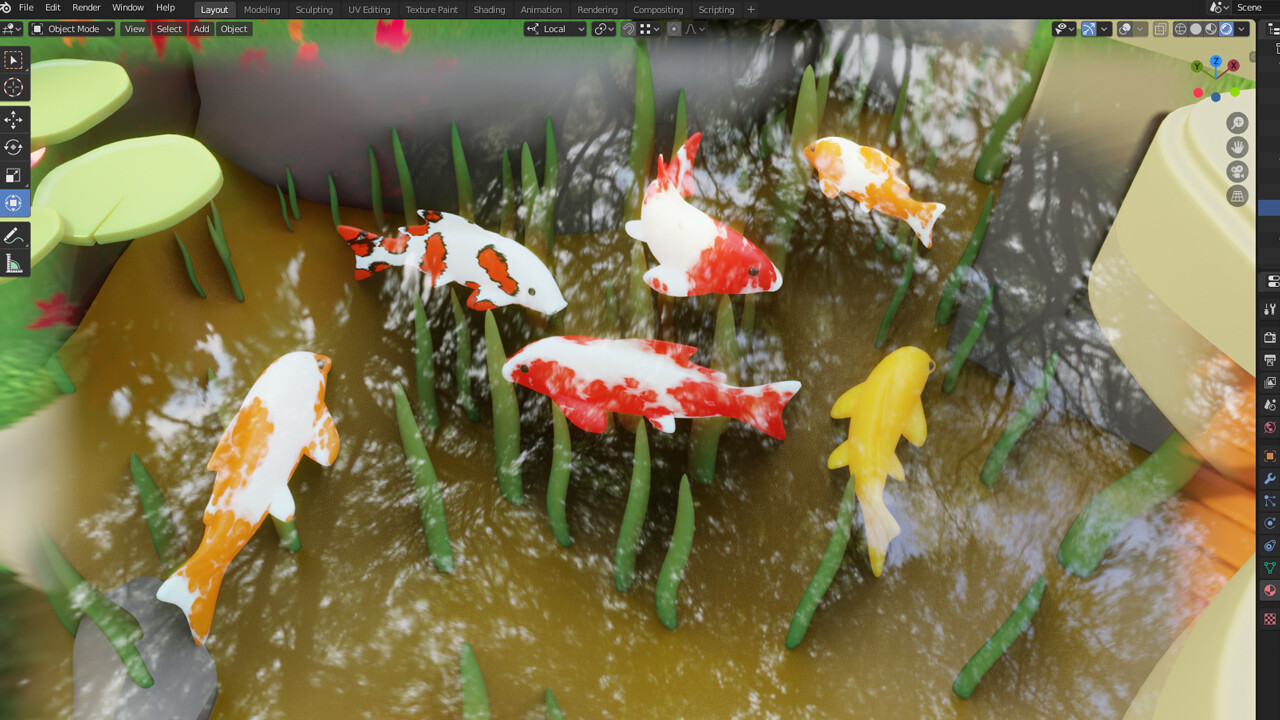
Materials for the Koi Fish
For creating the Koi fish Material in Blender, I recommend a very nice tutorial by String Fairy. I have added it below for anyone interested.
Rocks with Particles
The rocks that surround the base are using a particle system. First, I created a low poly cylinder and then added a particle system using a rock collection. It then creates a rounded wall type looking rock structure. It was efficient and easy to create a base quickly and customize as needed. For the rocks, I created a set of low poly and some smooth high poly rocks.


Increasing the particle count spreads the rocks along the base mesh

Creating Trees
The trees were created using a great free Modular Tree add-on by Maxime Herpin. It allows a variety of trees to be created quickly and with leaves. This add-on allows node-based tree generation which is fast and can be customized as needed.

Trees created using the Modular Tree Add-on
This is a download link for it and with tutorials on how to use this tree add-on
https://www.blendernation.com/2019/06/17/blender-2-8-tree-creation-with-the-modular-tree-add-on/
Water
For the water material, I used a refraction node and a glossy node to create it.
I have attached the node view for it below. Although there was room for improvements for the water shader I was happy with the result I needed.
I have added a small noise displacement on the water plane to break the reflections a little bit.

Eevee Viewport Water

Water Node Setup
Lighting and Rendering
For the lighting of the scene, the ambient source of light comes from the HDR map which I used in the world environment setting. The HDRI map I used is from HDR Haven, which offers great quality of free HDRI maps.

With HDRI Lighting

With sunlight added
The other source of light is the sunlight. I used it to add more lighting to the scene and for better shadow control. I used Eevee for most of the real-time views and animated turntable. Later, I did some new renders in Cycles to get more refine details and for a more improved visual quality.
For Eevee rendering, the settings are standard which I used. They work mostly well. But depending on any scene, I recommend changing values as needed. Each render generated is almost instant as results are real-time.
- Ambient Occlusion
- Bloom
- Screen Space Reflections/ Refractions
- Soft Shadows
- Color Management Look Contrast


I have added a standard world node setup that I use always in my work.
First thing, It hides the HDRI map but will keep the HDRI lighting to show in the scene. The other thing it does is, it allows any background color to set in the render and viewport.

Creating a Turntable Animation Real-time with Eevee
Finally, in the end, I was looking to create 360 turntable realtime animation. For this, I used a very good free add-on available in Blender. (Turnaround Camera) It will create a camera rotation around any specific object.

Keeping the Scene Organized
I usually create a separate collection in the outliner to manage the scene. It helps at the later stage when there are many objects in the scene and I want to select, find any particular item to work on. I have attached the outliner view below. Just giving a simple name to a collection of objects can be useful.

Some Additional Views of the Garden Scene.


For the future, I may update this scene one more time with more animated objects like leaves falling, fish movements and overall maybe a snow setting for winter.
I had a great time making it and I hope you find it useful in some way. Feel free to let me know in the comments below if you have any questions and I will be happy to reply.
Thank you for checking this! Have a good day!
Farrukh.